Replacing the internal
Garmin GPS battery
Caution - this procedure takes close-up work on your GPS circuit board with soldering of the small battery wires on the board. Do not attempt unless you have a steady hand and magnified vision. Patience and nerves are also required. Permanent damage to your GPS may result by following this procedure. I told you so ... now you can proceed. (see Joe Bain's note at the bottom with a helpful tip)
The Problem:
Some of us have had issues with the Garmin 296/396/496 not picking up the
satellites after a week or two in the hangar.
Mine failed to connect to the satellite after 30 minutes which prompted
this exercise. Most of us agree it
is the internal 3 Volt
Tools required:
Low wattage fine tip soldering gun
Fine Phillips screwdriver
Small straight tip screwdriver
Razor knife blade for slicing spot welded terminals from battery
Tweezers
Needle nose pliers
Parts Required:
New VARTA MC621 3.0 mAh rechargeable Lithium battery
(This is the one I used, Sanyo
battery from Digi-key SY103-ND.)
Get a well lit workbench to start on.
1. Remove all of the screws from the back side of the case.
2. Next - there is a nut holding the antennae post on the back of the GPS. Use a screwdriver to unscrew it.
3. Use a thin screw driver blade to gently pry apart the case. Pry on the portion under the buttons, not under the screen. Otherwise you may damage the screen. There is a gasket between the case halves so be careful not to damage it also.
4.
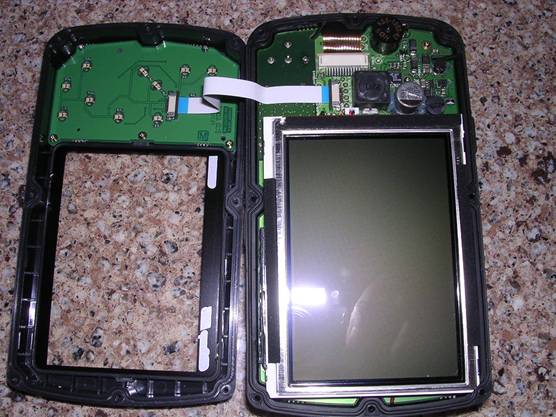
With halves apart you will find the following ...
5. Remove the white ribbon cable that goes top both halves by gently sliding it out of the slot on the "screen" half.
6. Next - gently lift the screen and take look at the ribbon cable & 2 wire connectors attached.
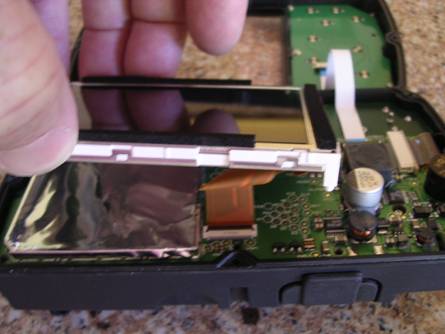
7. I left the copper colored ribbon in place, but you must remove the red & black "power" wire at the side. To remove this you must hold the base (connected to the board) while pulling the wire plug straight up with tweezers. Be careful or you will have to solder this part on also!

8. With the screen flopped over you can peel back the foil shielding to get access to the two screws underneath. There are 2 screws under the foil, and 2 screws visible on the board. Remove all 4 screws.
9. Next there is a ribbon cable on the "button" end that wraps to the other side. To remove it you must slide the "clip" portion sideways and swing it up. This will release the ribbon cable.
1 You are now ready to remove the screen/circuit board combo and get to the other side.
1
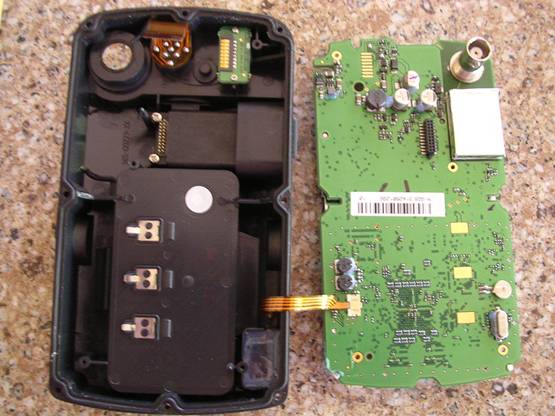
Here's the other side with our round coin battery. The stock battery is made in Germany and rated at 3VDC ~7mm diameter. It is soldered to the board with 2 tabs. The tabs are spot welded to the battery. Use a Volt Ohm meter to verify the +/- direction and write it down.
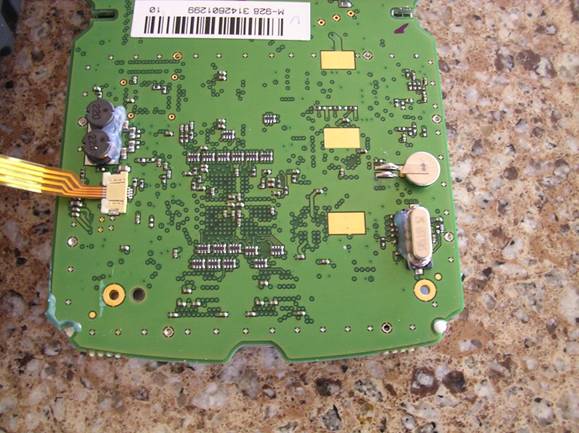
Unsolder the tabs from the board and your old battery will fall in your hands.
The assembly is the reverse order. No magic here, just be gentle and put it all back in place.
Upon boot up my GPS locked on the satellites in about 20 seconds. None of the routes, or previous flights were lost with the battery out. It was like I had a new GPS! Considering the cost for Garmin to do this work I thought the risk was worth the reward. If it didn't work I would have sent it in anyway - so no loss. Hope this helps some of you in fixing Garmin.
Kelly
Patterson - RV-6A
N716K - 602-448-3518
cell - Moving
to
_________________________________________________________________
Kelly asked someone to put this info on the Web and volunteered to do it.
I did this to my Garmin 296 and it is working fine months afterward. Here is a link to my pictures and comments:
https://goo.gl/photos/eQyAwVEQhCVKFnYu5
____________________________________________________________________________________
Here is a e-mail I received from Kelly Patterson, 22 Oct 2009:
Hi Bobby,
I got a call from Duffy Fainer in San Diego as he was going
through his 296 battery replacement and have a follow up to this item.
After replacing the battery in my GPS it worked fine for a
while, and then began having the same problems. I contacted Garmin and
they said "Send it in".
A week later I received a brand new GPS and a note saying
there was no charge! No comment was made on my repairs.
I gave Duffy the same info and he got the same response
from Garmin. So this must be a known fault of the internal workings and
they are sending replacements.
If you could update your website to state that your best
course of action is to contact Garmin I think everyone would be most
appreciative.
Thanks and blue skies!
Kelly Patterson | Littleton, CO | 303-346-4627 direct | 602-448-3518 cell